A. Upload Plugin to WordPress
First upload the plugin to WordPress using one of the following methods
Automatic Install (recommended)
Login to your Dashboard as an admin. Once logged in select Plugins > Add New from the main menu. Next search for “wpbook” (no quotes) and click the install button.

Manual Install
Copy the entire wpbook directory into your wordpress plugins folder,
/wp-content/plugins/
You should have a directory structure like this (of course you’ll likely have different plugins installed):

B. Create Facebook App
Set up a New Application at http://www.facebook.com/developers, obtaining an App ID, App Secret and API key. Once you have an app you’ll need to enter the following settings.
Basic Info Section
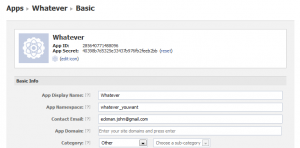
When you first request the app you’ll be asked for an App Display Name (what users will see the app called) and Namespace (a machine friendly version with no spaces, all lower case, no special characters):
Here is just basic information for your app. You may use the image above (click for full size) to help you fill out the settings if needed. The App ID and App Secret will be provided by Facebook. The contact email is not displayed but users can use it to contact you if they have problems with your app. The app domain should be the domain at which your blog lives.
Website Section
In the “Choose how your application integrates with Facebook,” click to open the “Website” section:
Here you’ll need to provide the site url, which should be the url of your WordPress install. This is the url users use to hit the main page of your WordPress powered site, whether that is a static front page or your blog listing page. Do NOT including index.php, but including a trailing slash.
App on Facebook Section
Then click on the App on Facebook section to open those settings:
In this case, the “Canvas URL” should be the default home page of your WordPress site outside Facebook.
The “Secure Canvas URL” should be the address where your WordPress blog can be accessed via https://. (NOTE: if you cannot access your blog via https, you can’t use WPBook – but you can use WPBook Lite.)
Page Tab Section
Finally, click on the “Page Tab” section to open these settings:
The last settings are the “Tab Name” and “Tab URL”. Set the “Tab Name” to something that represents your blog. This is the public name that will be shown the user. So keep it simple. In the “Tab URL” enter the full url of your WordPress install plus the following querystring:
?app_tab=true
Note that the secure page tab url is just the same but with https protocol. Leave Page Tab Edit URL blank.
Leave the rest unchanged, and save changes.
Note: As of late February 2012, it is necessary to change some of the advanced settings on a new Facebook Application based on changes Facebook is making.
C. Activate the Plugin
Login to your WordPress Admin and activate the “WPBook” plugin (Dashboard->Plugins->WPBook>Activate).
D. Fill out Basic Plugin Settings
Required Settings
Using the WPBook menu, (Dashboard->Settings->WPBook) fill in the appropriate information including Facebook application secret, API key, and canvas url.
After you’ve filled in the required settings, jump to the bottom of the page and hit “save” to save your settings.
That’s It!
You should now be able to visit your Facebook application’s URL (it will look something like http://apps.facebook.com/[YOUR_CANVAS_URL]/, with the “YOUR_CANVAS_URL” part replaced with whatever you provided on the “Facebook Integration” tab in Facebook, under the setting titled “Canvas Page”
From Here You may wish to visit:
Install Instructions
Stream/Wall Settings
Application View Options


